Windows 11 comes packed with features, but some of the best performance tweaks and privacy enhancers are hidden in the settings. In this guide, we’ll unveil 7 hidden Windows 11 settings that can boost your PC’s speed and strengthen your privacy. These tips range from simple toggles for casual users to more advanced tweaks for power users. Follow the clear step-by-step instructions for each setting, and you’ll optimize Windows 11 for a faster, more private experience. Let’s have a look!
1. Enable the Hidden “Ultimate Performance” Power Plan
One of the lesser-known Windows 11 performance tips is the Ultimate Performance power plan. This plan is designed for high-power systems to boost PC speed by eliminating micro-latencies in power management. By default, it’s hidden on most PCs (except workstations), but you can enable it manually:
Open PowerShell as Administrator: Right-click the Start button and select Windows Terminal (Admin) (or PowerShell Admin).
Enable Ultimate Performance: In the PowerShell window, type the command:
Press Enter. This command adds the Ultimate Performance plan to your power schemes.
Activate the Plan: Now go to Control Panel > Power Options. Click on Additional power plans and select Ultimate Performance from the list.
Once activated, your PC will favour performance over power efficiency. This can speed up heavy tasks by letting the CPU run at full throttle without power-saving interruptions.
Implications: Keep in mind that this mode can increase energy use and battery drain on laptops. It’s best for desktops or when your laptop is plugged in. If you need to conserve power (on battery, for example), switch back to Balanced mode.
2. Turn Off Visual Effects (Animations and Transparency)
Windows 11’s sleek animations and transparency effects make the interface look pretty, but they can also slow down your PC – especially on older or low-end hardware. Disabling these visual effects is an easy way to boost Windows 11 speed:
Open Settings: Press Win + I to open Settings, then navigate to Accessibility > Visual Effects.
Disable Animation Effects: Toggle off Animation Effects. This stops the fancy window and menu animations, making interactions snappier.
Disable Transparency: Toggle off Transparency Effects to stop Windows from rendering translucent windows and taskbar. This can slightly improve performance and also prevent background images from showing through (which some find distracting).
Alternatively, for more control, you can adjust visual effects via the classic Performance Options:
Press Win + R, type systempropertiesadvanced, and hit Enter.
Under Performance, click Settings…. In the Visual Effects tab, you can select “Adjust for best performance” (which turns off all animations, shadows, and effects) or choose Custom and uncheck specific effects (like Animate windows when minimizing and maximizing).
Click OK to apply.
By turning off animations and transparency, Windows will feel more responsive. Windows won’t spend time fading or sliding UI elements, which can make even a slower PC feel faster. Trade-off: The desktop may look less dynamic or “flat.” If you prefer aesthetics over speed, you might keep some effects on. You can always re-enable these if you miss the visual flair.
3. Disable Unnecessary Startup Programs for Faster Boot
Many apps sneak into your startup list, causing Windows 11 to boot more slowly. Disabling these startup programs is a straightforward Windows 11 performance tip to speed up boot time and reduce background resource usage:
Open Startup Settings: Press Ctrl + Shift + Esc to launch the Task Manager, then click the Startup tab. (If you see no tabs, first click “More details.”) Alternatively, go to Settings > Apps > Startup to see a list of startup apps.
Review Startup Impact: In the Task Manager’s Startup tab, you’ll see each program and its “Startup impact.” Look for programs marked High impact that you don’t need immediately after boot (for example, third-party updaters, chat apps, or helper programs you rarely use).
Disable Unneeded Apps: Right-click on a program and choose Disable. In Settings > Apps > Startup, simply flip the switch off for each app you want to disable.
Some common culprits to consider disabling include game launchers, cloud storage clients (if you can open them manually when needed), and helper apps that aren’t essential. Disabling them prevents them from auto-launching with Windows.
Implications: The next time you restart, those apps won’t automatically run, resulting in a quicker startup and less immediate CPU/RAM usage. All disabled programs can still be launched manually when you need them – you’re just removing the automatic startup. As a trade-off, you might need to wait a moment when you do choose to open those apps later, since they’re not pre-loaded. Keep security software enabled at startup, but most other apps are optional. You can always re-enable any app by returning to the same menu if you find you miss it.
4. Stop Background Apps from Hogging Resources
Windows 11 allows modern apps to run tasks in the background (checking for updates, sending notifications, etc.). While convenient, this can slow down your PC and even raise privacy concerns (apps running when you don’t expect them). Limiting background activity will boost PC speed and potentially protect privacy by stopping unwanted data exchange in the background.
Here’s how to curb background apps:
Per-App Background Permissions: Open Settings > Apps > Installed Apps. Find an app that you suspect might run in the background (for example, Weather or other news apps). Click the ⋮ three-dot menu next to it and choose Advanced options. Scroll to Background apps permissions and you’ll see a drop-down (in Windows 11, it’s often set to Power optimized by default). Change this to Never for apps that don’t need to run in the background.
Repeat as Needed: Unfortunately, Windows 11 removed the single master switch for all background apps that Windows 10 had. You’ll need to adjust important apps one by one. Focus on apps like weather, news, email, or social media clients that might be updating in background without you opening them.
Alternative via Battery Settings: You can also go to Settings > System > Power & Battery > Battery usage. Here you might see which apps use background resources. Clicking on an app will give an option to manage background activity (which leads to the same setting above).
After setting unnecessary apps to Never run in background, those apps will only use CPU or network when you actually open them. This can improve performance (fewer background tasks consuming CPU/RAM) and even battery life on laptops. It also enhances privacy, since apps won’t be quietly collecting data or sending notifications when not in use.
Implications: If you disable background activity for an app, you won’t get its notifications or updates until you open it. For example, if you set a mail app to never run in background, you’ll only receive new emails when you manually launch the app. Choose what’s acceptable depending on the app’s importance to you. Most system apps (like security or OneDrive sync) either aren’t configurable here or you might want to keep them running; so focus on non-essential apps.
(Advanced tip: Windows 11’s Task Manager also has an Efficiency Mode feature. If you notice a particular process eating a lot of CPU in the background, you can open Task Manager, right-click the process and choose Efficiency mode to throttle its resource usage. This isn’t a permanent setting, but can be useful to tame a background process without fully killing it.)
5. Limit Diagnostic Data & Telemetry
Microsoft collects diagnostic data (telemetry) from Windows 11 to improve the OS experience. However, if you’re privacy-conscious, you might want to reduce this data sharing to the minimum required. Additionally, sending less data means slightly fewer background processes and network usage, which can marginally improve performance. Here’s how to adjust Windows 11 privacy settings related to diagnostics:
Open Privacy Settings: Go to Settings > Privacy & security > Diagnostics & feedback.
Required vs Optional Data: Under Diagnostic data, switch the setting to Send required diagnostic data only. By default, Windows may send “Optional” data (which is more comprehensive). Choosing “Required” limits it to basic info needed to keep Windows secure and up-to-date.
Turn Off Tailored Experiences: Below that, turn off “Tailored experiences”. This stops Windows from using your diagnostic data to offer you personalized tips, ads, or recommendations.
Delete What’s Been Collected: You can also scroll down and use the Delete diagnostic data button to clear diagnostic data Microsoft has collected from your device, and turn off Feedback frequency or set it to minimal (like “Never” for asking for feedback).
By doing this, you’re essentially opting out of all optional telemetry. Windows will no longer collect detailed usage data like app usage habits or extensive error reports. Only basic information (like device info, basic errors, and whether updates succeed) will be sent. According to Microsoft, required data is limited and crucial for the system’s health, while optional data is more detailed and used for product improvements and personalized suggestions.
Implications: The immediate benefit is improved privacy – less data about your PC use is sent to Microsoft . You might also notice slightly less background network activity and a very small reduction in CPU usage (since fewer telemetry processes are running). The trade-off is that Microsoft won’t have as much info to tailor your Windows experience or troubleshoot issues automatically. For instance, with full telemetry off, the Tips app or Start menu might not show “suggested apps” (which many consider a positive). Overall, most users won’t see any negative effect from disabling optional diagnostic data, and it’s a recommended tweak for privacy.
6. Tweak Privacy Settings (Advertising ID, Location, and More)
Windows 11 has several built-in privacy settings that are on by default and could leak personal data or simply be unnecessary. Tweaking these can both strengthen your privacy and stop some background tasks that consume resources. Key settings to review:
General Privacy Settings: Go to Settings > Privacy & security > General. You’ll see toggles for things like “Let apps show me personalized ads using my advertising ID”, “Let Windows improve Start and search by tracking app launches”, and “Show me suggested content in the Settings app.”
Disable Advertising ID: Toggle off the personalized ads option. This prevents Windows from using a unique advertising ID per user to track app usage and show targeted ads. Apps will still work, but any ads they show will be generic (better for privacy).
Stop App Launch Tracking: Toggle off the setting that tracks app launches. This is mainly used to personalise your Start menu and search results. Disabling it can slightly speed up your system because Windows isn’t logging every app you open, and it enhances privacy by not recording that info.
Disable Suggested Content: Turn off the suggested content in Settings. This stops Microsoft from pushing tips or suggestions (which could be ads or features) in your Settings pages.
Location and Camera/Microphone: If you don’t use location-based services on your PC, consider turning off Location access: go to Privacy & security > Location and toggle off location services (or at least restrict which apps can access location). Similarly, check Camera and Microphone permissions – disable access for apps that shouldn’t have those permissions. This reduces background sensors usage and protects privacy.
App Permissions: Review other categories under Privacy & security, such as Contacts, Calendar, Phone calls, Messages, Radios. If you see any app with unnecessary access, revoke it. For example, you might disable “Let apps access my camera” if you never use a webcam, etc.
By tweaking these settings, you’re essentially opting out of Windows features that trade a bit of your data for convenience or personalization. For instance, turning off the advertising ID means Microsoft (and apps) cannot build a profile of your app usage for ad targeting . In the screenshot, the third-party privacy tool O&O ShutUp10++ shows toggles to disable such features (e.g. “Disable and reset Advertising ID” is turned on, along with other privacy-centric settings).
Implications: After adjusting privacy toggles, you might notice fewer personalized experiences. Ads within apps (like free games or news apps) might be less targeted (often a good thing). Your Start menu’s “Recommended” section may become less tailored or useful since app launch tracking is off. Overall system performance could slightly improve because Windows isn’t performing extra background logging for these features. The main benefit is peace of mind: your Windows 11 will not be needlessly sharing data about your app usage, location, or habits. If you ever do need a feature (say you want Cortana or Weather to have your location), you can re-enable that specific permission.
7. Use O&O ShutUp10++ for Advanced Privacy Tweaks
For those who want to take Windows 11 privacy to the next level, third-party tools can expose even more hidden settings. One of the most trusted utilities is O&O ShutUp10++ – despite the name, it’s fully compatible with Windows 11. This free tool gives you a simple interface to toggle dozens of privacy and performance-related settings that are otherwise buried or unavailable in the normal Settings app.
What O&O ShutUp10++ does: It lists a wide range of tweaks, from disabling telemetry and data collection, to turning off Cortana, OneDrive integration, and other background services. Each setting is labelled with a recommended status (green = safe to disable, yellow = use caution, red = know the trade-off). You can apply all recommended tweaks in one go, or pick and choose individually. For example, you can disable things like “Send Windows usage data for advertising”, “Enable Windows Defender cloud protection” (if you prefer not to send files to Microsoft), and many more under-the-hood options .
How to use it:
Download O&O ShutUp10++: Visit the official O&O ShutUp10++ page and download the tool (it’s a portable .exe, no installation required). Ensure you get it from the official O&O site or a reputable source.
Run as Administrator: Launch the .exe and give it admin permissions. You’ll see a long list of settings with toggles (and a description for each if you click on it).
Apply Recommended Settings: If you’re not sure what to do, you can go to Actions > Apply only recommended settings. This will turn off a lot of Windows tracking features and bloat safely. For instance, it will disable telemetry, typing and inking data collection, Cortana, feedback requests, and other Windows 11 privacy settings that are better turned off for most users.
Review Orange or Red Settings: Some tweaks are marked as “somewhat recommended” or have potential side effects (shown in yellow or red). Read their descriptions (the tool provides info for each). For example, disabling Windows Updates via policies is possible (red) – great for privacy and control, but you’ll stop getting security updates, so it’s usually not advised. Only apply these if you understand the implications.
Save and Reboot: Once you’ve toggled your desired settings, close the app. A reboot may be required for some changes to take effect. You can always run the tool again to adjust or restore settings (there’s an option to revert to Windows defaults if needed).
O&O ShutUp10++ gives you full control over many hidden Windows 11 settings. Green toggles indicate recommended privacy tweaks have been applied (e.g., disabling telemetry, Advertising ID, and other data-sharing features).
O&O ShutUp10++ essentially acts as a centralized hub for privacy and some performance tweaks. It spares you from digging through Group Policy or the registry manually. The benefit is a highly locked-down Windows 11 with minimal telemetry and background chatter . Many users use it to achieve privacy configurations that even Windows 11 Pro’s settings UI cannot do easily.
Implications: Be cautious with powerful tools – while O&O ShutUp10++ only changes Windows settings, toggling the wrong thing could disable functionality you actually use. The tool’s recommendation system helps avoid that. For instance, turning off telemetry and ad ID (green) is safe, but turning off all Windows Update (red) is risky long-term. The good news is O&O’s changes are reversible – you can apply a “Revert recommended settings” or create a system restore point before changes (the app will prompt you to do so). Overall, using this utility in its default recommended mode will yield a more private, slightly leaner system without negative effects. It’s a one-stop solution to harden Windows 11 privacy beyond the default options.
By tweaking these seven hidden settings, you can optimize Windows 11 for a smoother and more secure experience. You’ve learned how to unleash the Ultimate Performance plan for maximum speed, trim down eye-candy effects, and stop unwanted apps from bogging down your system. On the privacy front, you’ve limited Windows 11’s data collection and shut the door on needless tracking – from reducing telemetry to killing the ad ID and other curiosities. These changes supercharge your PC’s speed by freeing up resources and boost your privacy by keeping your data in your hands.
Remember that every system and user is different. Feel free to adjust the recommendations to suit your needs – it’s all about finding the right balance between functionality, performance, and privacy. The beauty of Windows 11 is that it’s highly configurable once you know where to look. With the performance tips and privacy settings above, both casual users and power users can get more out of their PCs. Enjoy a faster, more private Windows 11 experience – you’ll notice the difference in snappier performance and the peace of mind that comes with enhanced privacy.
Paul Balo is the founder of TechBooky and a highly skilled wireless communications professional with a strong background in cloud computing, offering extensive experience in designing, implementing, and managing wireless communication systems.
We use cookies to ensure that we give you the best experience on our website. If you continue to use this site we will assume that you are happy with it.

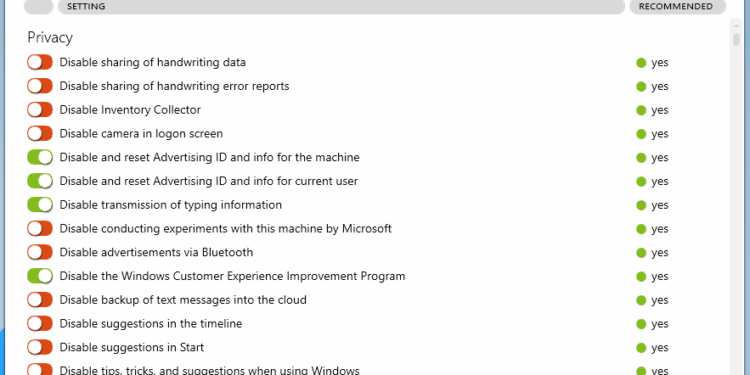 By tweaking these settings, you’re essentially opting out of Windows features that trade a bit of your data for convenience or personalization. For instance, turning off the advertising ID means Microsoft (and apps) cannot build a profile of your app usage for ad targeting . In the screenshot, the third-party privacy tool O&O ShutUp10++ shows toggles to disable such features (e.g. “Disable and reset Advertising ID” is turned on, along with other privacy-centric settings).
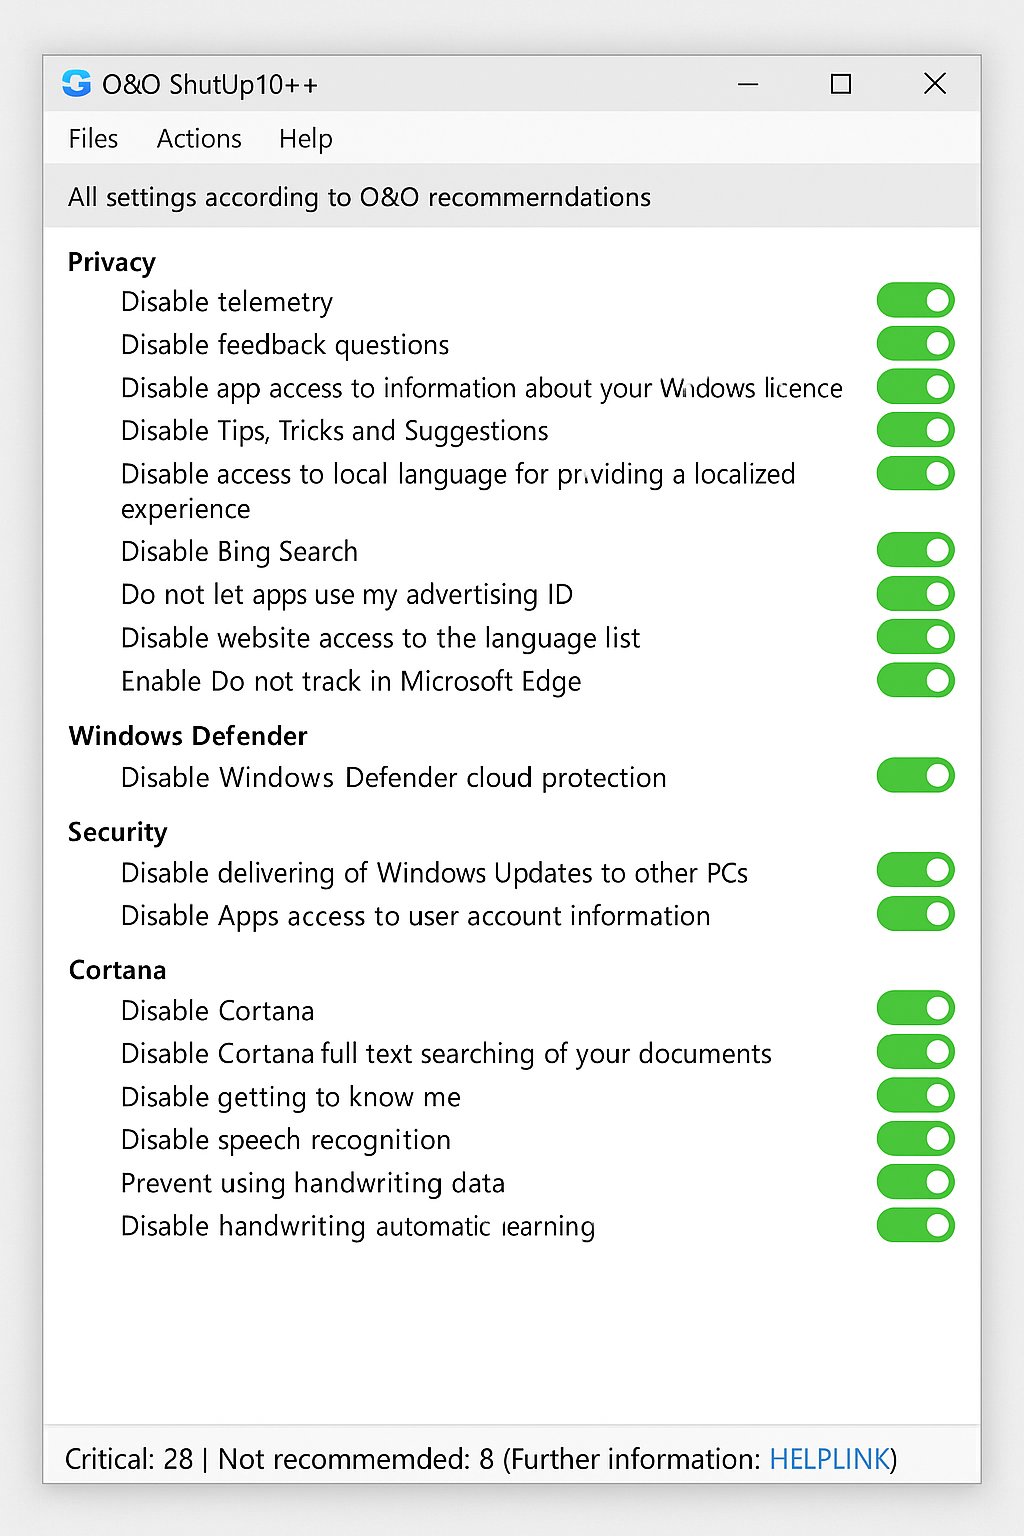


